Quick Look
Grade Level: 7 (6-8)
Time Required: 1 hours 45 minutes
(two 50-minute class periods: one period to introduce concepts and get familiar with setup, and one period to design a solution and test it.)
Expendable Cost/Group: US $0.00
Group Size: 3
Activity Dependency: None
Subject Areas: Chemistry, Earth and Space, Measurement, Physical Science, Problem Solving
NGSS Performance Expectations:

| MS-ETS1-1 |
| MS-ETS1-2 |
| MS-PS1-1 |
Summary
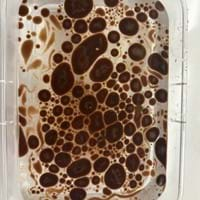
Students learn about the concept of polarity and mixing through the phenomenon of oil separating from water by simulating an oil spill that demonstrates the impact of these molecular qualities on the environment. In the first part of the activity, students get familiar with the concept of polarity and how it causes oil to float on water through molecular models and demonstrations. The second part entails a simulation of an oil spill in the ocean, where students are given a variety of tools and will engineer their own solutions to clean up the spill through trial and testing. Finally, they discuss the real-world methods used to clean up oil spills, and their impact on the environment.Engineering Connection
Oil spills are a common environmental problem for which solutions are still being engineered today. Chemical dispersion (demonstrated by soap in this activity) is a legitimate technique used to clean up oil spills. Oil spills have negative environmental impacts, as oil sinks to the bottom of the ocean and is not removed. Skimming, absorption, and manual removal are techniques used to clean up oil spills on a large scale. Students are able to get a glimpse of the actual design process that goes into solving this environmental issue.
Learning Objectives
After this activity, students should be able to:
- Understand the concept of polarity and polar molecules.
- Explain whether polar and nonpolar molecules mix.
- Discuss the effects of oil spills on the environment.
- Brainstorm solutions to simple environmental issues.
Educational Standards
Each TeachEngineering lesson or activity is correlated to one or more K-12 science,
technology, engineering or math (STEM) educational standards.
All 100,000+ K-12 STEM standards covered in TeachEngineering are collected, maintained and packaged by the Achievement Standards Network (ASN),
a project of D2L (www.achievementstandards.org).
In the ASN, standards are hierarchically structured: first by source; e.g., by state; within source by type; e.g., science or mathematics;
within type by subtype, then by grade, etc.
Each TeachEngineering lesson or activity is correlated to one or more K-12 science, technology, engineering or math (STEM) educational standards.
All 100,000+ K-12 STEM standards covered in TeachEngineering are collected, maintained and packaged by the Achievement Standards Network (ASN), a project of D2L (www.achievementstandards.org).
In the ASN, standards are hierarchically structured: first by source; e.g., by state; within source by type; e.g., science or mathematics; within type by subtype, then by grade, etc.
NGSS: Next Generation Science Standards - Science
| NGSS Performance Expectation | ||
|---|---|---|
|
MS-ETS1-1. Define the criteria and constraints of a design problem with sufficient precision to ensure a successful solution, taking into account relevant scientific principles and potential impacts on people and the natural environment that may limit possible solutions. (Grades 6 - 8) Do you agree with this alignment? |
||
| Click to view other curriculum aligned to this Performance Expectation | ||
| This activity focuses on the following Three Dimensional Learning aspects of NGSS: | ||
| Science & Engineering Practices | Disciplinary Core Ideas | Crosscutting Concepts |
| Define a design problem that can be solved through the development of an object, tool, process or system and includes multiple criteria and constraints, including scientific knowledge that may limit possible solutions. Alignment agreement: | The more precisely a design task's criteria and constraints can be defined, the more likely it is that the designed solution will be successful. Specification of constraints includes consideration of scientific principles and other relevant knowledge that is likely to limit possible solutions. Alignment agreement: | All human activity draws on natural resources and has both short and long-term consequences, positive as well as negative, for the health of people and the natural environment. Alignment agreement: The uses of technologies and any limitations on their use are driven by individual or societal needs, desires, and values; by the findings of scientific research; and by differences in such factors as climate, natural resources, and economic conditions.Alignment agreement: |
| NGSS Performance Expectation | ||
|---|---|---|
|
MS-ETS1-2. Evaluate competing design solutions using a systematic process to determine how well they meet the criteria and constraints of the problem. (Grades 6 - 8) Do you agree with this alignment? |
||
| Click to view other curriculum aligned to this Performance Expectation | ||
| This activity focuses on the following Three Dimensional Learning aspects of NGSS: | ||
| Science & Engineering Practices | Disciplinary Core Ideas | Crosscutting Concepts |
| Evaluate competing design solutions based on jointly developed and agreed-upon design criteria. Alignment agreement: | There are systematic processes for evaluating solutions with respect to how well they meet the criteria and constraints of a problem. Alignment agreement: | |
| NGSS Performance Expectation | ||
|---|---|---|
|
MS-PS1-1. Develop models to describe the atomic composition of simple molecules and extended structures. (Grades 6 - 8) Do you agree with this alignment? |
||
| Click to view other curriculum aligned to this Performance Expectation | ||
| This activity focuses on the following Three Dimensional Learning aspects of NGSS: | ||
| Science & Engineering Practices | Disciplinary Core Ideas | Crosscutting Concepts |
| Develop a model to predict and/or describe phenomena. Alignment agreement: | Substances are made from different types of atoms, which combine with one another in various ways. Atoms form molecules that range in size from two to thousands of atoms. Alignment agreement: Solids may be formed from molecules, or they may be extended structures with repeating subunitsAlignment agreement: | Time, space, and energy phenomena can be observed at various scales using models to study systems that are too large or too small. Alignment agreement: |
Materials List
Each group needs:
- 1 plastic tub (18.9 L or similar)
- cup or beaker (see through)
- 1 ruler
- Oil Spill Cleanup Worksheet
- 1/4 cup cooking oil
- 1 tbsp oil-based dye or cocoa powder
For the entire class to share:
- food scale or similar (optional)
- microwave
- water
- remediation materials
- kitchen salt
- dish soap
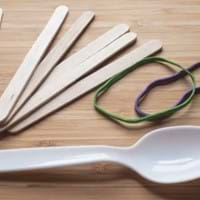
- plastic spoons
- twine / string (6.35 m ball or similar)
- cotton balls
- craft sticks
- ice
Worksheets and Attachments
Visit [www.teachengineering.org/activities/view/cub-2767-oil-spill-cleanup-polarity-activity] to print or download.Pre-Req Knowledge
Familiarity with the nature of molecules and atoms.
A basic understanding of states of matter.
A familiarity with electric charge and/or magnets and how they repel or attract.
Introduction/Motivation
Today we’re going to start by looking at some photos of oil spills in the ocean. Do you know how they can impact sea life, and how long they can last in the environment? (Optional: Show Slide 5 of the Oil Spill Cleanup Presentation.) Do you see how the oil separates from the water to form a film on top of the sea? We’re going to be observing and analyzing the fact that oil separates from water, and our engineering/design challenge is to clean up oil spills from the ocean. (If possible, try to demonstrate oil’s hydrophobic properties by getting a clear beaker or test tube and pouring water, then oil, to see how it floats and mixes.)
(After demonstrating the environmental impacts and the phenomenon of interest, have the students discuss as a class how the hydrophobic properties of oil could potentially impact the environment through oil spills. (Optional: Show Slide 7 of the Oil Spill Cleanup Presentation.) Some guiding questions that can be asked include:
- What might happen if oil came into contact with an animal, such as a bird or fish? Would it stick? Would it be easy to remove?
- The oil would stick to the animal’s skin or could be dangerous if consumed. The oil on the skin would stick and would be difficult to remove.
- Does the fact that the oil floats on water make it easier to clean up?
- As the oil floats on the surface, it is easier to see and make strategies to remove it.
- What are other places in nature where things repel each other? Why or how does this happen?
- Other occurrences of repulsion in nature can be found in magnetic fields. For instance, magnets with opposite poles attract each other, while like poles repel when their fields interact. This is similar to the concept of polarity, where molecules with opposite charges attract.
- Do molecules have any properties that would make them repel each other?
- Magnetic forces repel one another.
- Can you (students) think of any ways to clean up an oil spill? (Hypothesizing solutions in a guided manner will help students come up with solutions when they begin to design and experiment.)
- Much like the methods simulated in the project, skimming and using adsorbents are effective methods for oil removal.
- How can engineers use the design process to formulate solutions for these problems?
- The engineering design process is a vital tool used to implement a methodical approach for solutions. Defining, researching, and developing a scope of solutions to the problem provides a foundation for engineers to develop an optimized strategy.)
Procedure
Background
Oil comes from accumulated organic matter below the ocean floor that developed into hydrocarbon material from heat and pressure over a long period of time. Oil (and natural gas) is predominantly used as an energy source for transportation, manufacturing, etc. It is shipped across the ocean because of the large global demand for oil.
Oil spills can occur from extraction and transportation accidents, equipment failure, natural disasters, or other contributing errors. Oil spills have detrimental effects on aquatic ecosystems by contaminating the water and food sources with harmful chemicals, which have long-term ecological impacts. Additionally, oil coats the water surface, compromising essential processes such as oxygen uptake and photosynthesis.
Oil spill duration is dependent on factors such as how much is spilled, as well as cleanup and mitigation measures employed. Some can be short term, while others take years to clear.
Real-world applications would include skimming oil from the water surface or applying chemical dispersants to break down oil in the case of a spill. Other removal methods entail controlled oil burning or natural biodegradation.
Machines such as skimmers and booms create a barrier to contain the oil and collect it from the surface through adsorption and suction. The increased focus on environmental stability and sustainability has brought about new technology to reduce the need for oil production and use. Satisfactory alternatives include renewable energy sources, electric power, natural gas, and biofuels.
Polarity: Hydrophobic means it has water-repelling properties and is more common with nonpolar molecules. This is important for many biological occurrences that hydrophilic molecules protect from water molecules. Polarity happens when molecules have charges that either attract or repel specifically in environments where the need for opposing forces acting as a total net force are required. Polarity is relevant to many real-world concepts, such as when understanding how molecules obtain their composition.
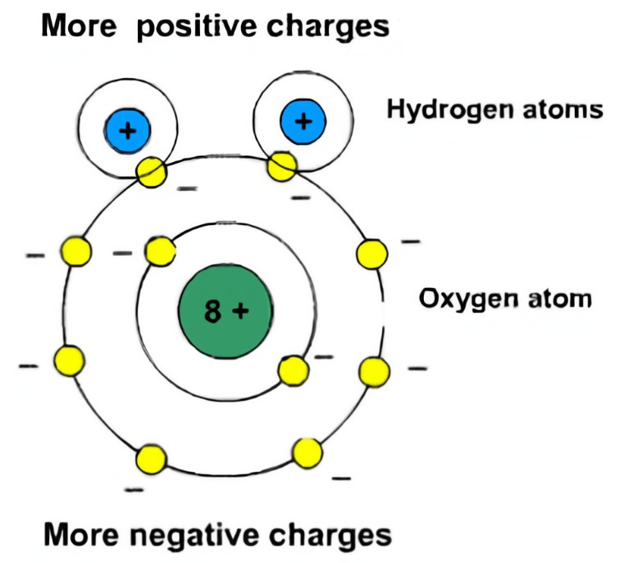
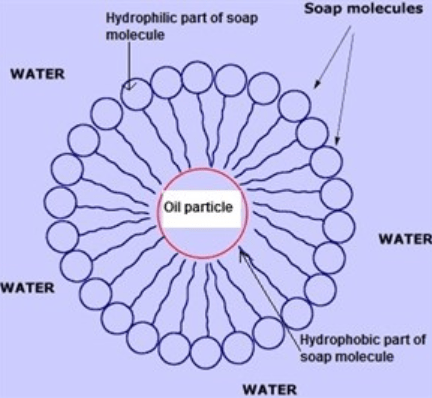
The Engineering Design Process (EDP) is a vital tool for engineers to strategize an alternative and creative approach when formulating solutions. This process includes the following components:
- Ask: Identify the needs and constraints.
- Research: Research the problem.
- Imagine: Develop possible solutions.
- Plan: Select a promising solution.
- Create: Build a prototype.
- Test: Test and evaluate the prototype.
- Improve: Redesign as needed.
Before the Activity
- Gather materials and make copies of the Oil Spill Cleanup Worksheet for students.
- Find images of oil spills to show students for the activity Introduction.
- Optional: Review the activity learning goals, molecules and charges, and polarity using Slides 1-4 of the Oil Spill Cleanup Presentation.
- Review the Engineering Design Process and Design Thinking (also see Slide 6 of the Oil Spill Cleanup Presentation for a visual).
With the Students
Part 1
- Divide the class into groups of three or four students each.
- Consider having groups nominate a notetaker to fill out the Oil Spill Cleanup Worksheet and split into roles.
- Optional: Show Slides 8-10 of the Oil Spill Cleanup Presentation to introduce the activity.
- Instruct groups to prepare their solution as described in Part 1 of the Oil Spill Cleanup Worksheet.
If a scale is available, have groups measure the weight of their “uncontaminated” water. (Students should weigh the initial contaminated water in the container as a comparison to the final to see how much of the oil was extracted. The ruler measurement may not be exact, so the weight is used as an indicator that material was removed.)
Part 2
- Instruct students on how to simulate their oil spill, drifting between groups to supervise. Groups should add 1/4 cup of dyed oil to their water and attempt to mix. As students complete the activity, they should be recording observations on the Oil Spill Cleanup Worksheet.
- If a scale is available, have groups measure the weight of their “contaminated” water.
- Instruct students to attempt to remove the oil from the water, using the materials provided. Give students about 20 minutes to try different strategies.
- Students should be recording qualitative data (observations) and quantitative data (based on scale or ruler).
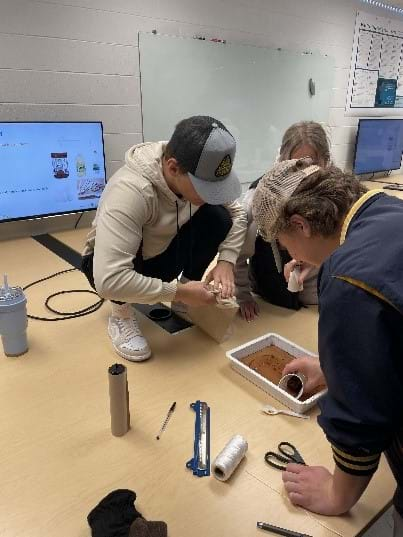
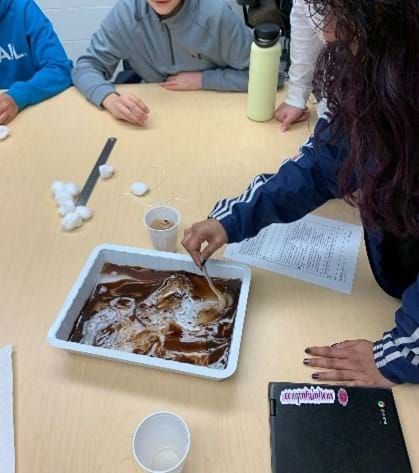
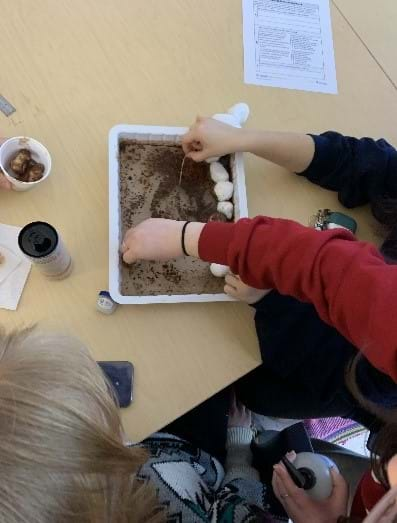
- Following the prompts in the Oil Spill Cleanup Worksheet, groups should discuss the results of their oil cleanup. Drift between groups to help students brainstorm and answer questions.
- Full-class discussion (20 minutes): Ask students to share the strategies they used to clean up their water. Optional: Show discussion questions on Slides 11-12 of the Oil Spill Cleanup Presentation.
- Which materials did they use? What worked? What didn’t?
- Ask students to write on the board or share why they think a particular strategy did or did not work.
- Ask groups to share their designed oil cleanup machines and the motivation behind the designs.
- Discuss with students the real-world applications of oil cleanup in fresh and saltwater environments and discuss real-world oil cleanup machines. Students should be able to identify which real-world machine most closely resembles their own and state clearly on their worksheet what cleanup technique they are employing.
- Discuss how polarity concepts relate to other real-world concepts.
- Wrap-up
- Collect worksheets from groups.
- Clean up by disposing of liquids down a drain and disposing of solids in the trash.
Vocabulary/Definitions
absorption: Technique to remove oil by using absorbents (i.e., filter).
covalent bonds: Bonds formed by sharing electrons.
hydrophobic: Repellent toward water; does not mix with water.
non-polar: A molecule where electrons are equally shared between atoms, creating zero dipole moment.
polar molecules: A molecule where distribution of electrons between atoms is uneven, creating a dipole moment (i.e., one end of the molecule is slightly positive while the other end is slightly negative).
polarity: The degree to which a molecule has properties of molecular attraction.
skimming: Technique used to physically separate oil from water (via adsorption) and place it in collection tanks (i.e., floating booms).
Assessment
Pre-Activity Assessment
Brainstorming: As a class, discuss what students already know about oil spills, how they can harm the environment, and how they are cleaned up. Do students know where oil comes from, what it is used for, or why it is shipped across the ocean? Ask students if they know of anything in their lives that uses oil (gasoline-powered cars and asphalt are good examples if students cannot think of any).
Pre-Assessment Question: Have students write what they know about oil and water mixing and polar molecules to get a sense of their understanding. Have them share in small groups if there is time.
Activity Embedded (Formative) Assessment
Group Discussion: Once the concepts of polarity have been explained, have students hypothesize ways to clean up an oil spill. Does the fact that the oil does not mix with the water help make this process easier? What will happen if a dispersant (such as dish soap) is added to the mixture?
Design: Have students design their own oil spill cleanup method and sketch it out in groups. This is a chance for them to use what they learned from testing, but also to be creative. It is okay if their solutions are not totally realistic; it is more important for them to think outside the box.
Instructor Checkpoint: Have students check in with the instructor before attempting to remove contaminants to ensure they gathered the correct readings. This is also an opportunity for the instructor to ask questions and confirm students are on the right track.
Post-Activity (Summative) Assessment
Worksheet Group Check: Have students compare the answers they put on the Oil Spill Cleanup Worksheet for their groups.
Class Discussion: To wrap up, discuss with the class how oil spills affect the environment. What impacts do oil spills have on wildlife and humans? Are there alternatives to using oil for modern technology?
Making Sense Assessment: Have students reflect on the science concepts they explored and/or the science and engineering skills they used by completing the Making Sense Assessment.
Investigating Questions
- What happens when you mix soap with oil and water? Do the two begin to mix? (Answer: When water and oil are mixed together, they are separated due to their molecular and polarity differences. When continuously mixed, the oil will form a layer on top of the water but, if left untouched, the two substances will separate completely.)
- What kind of molecule do you think soap is, polar or nonpolar? Could it be both? (Answer: Soap is partly polar and partly nonpolar, so you could say that it is partly both.)
- What was the most effective way to clean up the oil from the water? Why do you think this was? (Answer: Based on the methods used for this project, the cotton balls had the best outcome because they eliminated the most cocoa (oil) from the water. Another close solution would be the rubber bands, because they were used to skim the oil from the rest of the water. It closely simulates the real-world technique of skimming, which uses a boom and a skimmer.)
- Chemicals like soap are sometimes used to clean up oil spills in the ocean. Do these chemicals make the oil go away? What effect do you think mixing oil with water has on the environment? (Answer: The interaction between oil and soap is immiscible, meaning that it won’t dissolve when mixed. Therefore, using chemicals like soap is beneficial for managing oil dispersion, but it won’t eliminate or degrade it completely. It can have an adverse effect on aquatic environments in terms of contamination or limiting essential sunlight and oxygen exposure.)
Safety Issues
Safety precautions before starting the activity:
- Some liquids are safe to dispose of down the sink drain, and solids can be disposed of in the trash.
- Dispose of extra oil and any oil-filled water by adding the oil to kitty litter or coffee grounds in a nonrecyclable container. Dispose of the container and oil-solid mix in the trash.
- Although the bacteria that occur naturally during the experiment are generally harmless, students should nevertheless wash their hands after handling oils and powders.
- Materials should not be consumed.
Troubleshooting Tips
- Make sure that the oil and cocoa are thoroughly mixed before the mixture is added to the water. If it is not well mixed, the cocoa will separate in the water and make the experiment difficult to observe.
- Try to avoid adding dish soap immediately before trying other methods during the cleanup design section of the experiment. Adding dish soap immediately makes it difficult to see how the other methods will work. It might be useful to remove the dish soap as an option until a few minutes have passed, and then provide it.
- If necessary, some groups might need to dump their oil spill and remake it if it gets particularly messy.
- Providing paper towels to set dirtied tools down on and clean the table surface can help minimize mess.
Activity Extensions
- To demonstrate polarity in water, teachers can do a demonstration where a stream of water is bent using a charged object. Allow students time to predict the outcome and explain why they think the water will or will not bend.
- For a more hands-on polarity demonstration with younger children, have them experiment with magnets, ferric metals, and non-magnetic materials such as wood or plastic.
- For older students, have them add salt to the water to simulate the ocean, and discuss ionic bonds and how they interact with polar molecules. Why does salt dissolve in water? What property of water would help the salt dissolve?
Activity Scaling
To enhance the activity to fit your teaching curriculum, here are some other ways to adjust the lesson:
- For lower grades, have more emphasis on environmental impact, as this real-world application will likely be easier for students to grasp.
- For upper grades, incorporate a curriculum about electronegativity, dipole moments, and molecular geometry. In this way, students will connect chemistry concepts with a real-world issue.
Additional Multimedia Support
To reinforce deeper understanding of curriculum and polarity concepts, encourage students to explore the given simulation before class activity.
- Molecule Polarity simulation
Subscribe
Get the inside scoop on all things TeachEngineering such as new site features, curriculum updates, video releases, and more by signing up for our newsletter!More Curriculum Like This

Students explore an important role of environmental engineers—cleaning the environment. They learn details about the Exxon Valdez oil spill, which was one of the most publicized and studied human-caused environmental tragedies in history.

Students learn about the basics of molecules and how they interact with each other. They learn about the idea of polar and non-polar molecules and how they act with other fluids and surfaces. Students acquire a conceptual understanding of surfactant molecules and how they work on a molecular level. ...

Environmental engineers play a big role in the cleanup of oil spills. But how do you clean up a huge amount of oil that has been mixed in a body of water like the ocean? In this activity, students simulate a spill and cleanup and learn the effectiveness of different methods.

Students learn about oil spills and their environmental and economic impact. They experience the steps of the engineering design process, starting by brainstorming ways to clean up oil spills, and then designing, building and re-designing oil booms to prevent the spread of oil on water. During a con...
References
Bezonik, Patrick and Arnold, William. Water Chemistry: An Introduction to the Chemistry of Natural and Engineered Aquatic Systems. New York, New York: Oxford University Press, 2011.
“How Do We Clean Up Oil Spills?” YouTube, 21 April 2015, https://www.youtube.com/watch?v=3DbSlAg3F3A. Accessed 17 November 2022.
“Offshore Drilling: Pros and Cons.” BOP Products, 28 January 2022, https://www.bop-products.com/blog/drilling/offshore-drilling-pros-and-cons/. Accessed 17 November 2022.
“Oil Spills: Impact on the Ocean - sea, effects, temperature, percentage, important, largest, types, source, marine.” Water Encyclopedia, http://www.waterencyclopedia.com/Oc-Po/Oil-Spills-Impact-on-the-Ocean.html. Accessed 17 November 2022.
Upholt, Boyce. “Ten Years after Deepwater Horizon, Worries Remain.” Hakai Magazine, 20 April 2020, https://hakaimagazine.com/news/10-years-after-deepwater-horizon-worries-remain/. Accessed 17 November 2022.
Copyright
© 2024 by Regents of the University of ColoradoContributors
Vanessa Vaisanen, Elizabeth Tyson, Ricky Wood, Ryan Nelson, Tomi Oshima Dupeyron, UCBoulder EVEN students Ayush Shahi, UCBoulder PhD candidate; Azadeh Bolhari, course instructor and PI; Angela Bielefeldt, Co-PISupporting Program
University of Colorado Boulder Environmental Engineering Program and Idea ForgeAcknowledgements
This curriculum was developed under National Science Foundation grant number 2205067. Any opinions, findings, and conclusions, or recommendations expressed in this material are those of the authors and do not necessarily reflect the views of the National Science Foundation.
Last modified: March 13, 2024




User Comments & Tips